Getting started with HTML is relatively easier than any other technologies you'll ever learn. You do not need much setup to get started with, although a few tools are necessary for faster and smoother workflow. In this lesson we will go through all the pre-requisites and guide you to build your first web page with HTML.
We will cover:
- How to Get started with HTML
- The Web Page structure
- How to properly structure a web page
- Important language features
- Nesting Elements
HTML Development Setup
Writing HTML does not require any fancy set of tools. You can simply write html code in any simple ASCII text editor like Notepad on Windows or Textedit on Mac. Once you get it all you can then move on to professional development tools and IDEs. These tools will enhance your productivity with various built-in features like syntax highlighting, auto-complete etc. Some of the prominent tools for professional development are:
- VS Code - Free : One of the best IDEs out there for Web Development, free and open source.
- Sublime Text - Paid but Unlimited Trials : Another best IDEs with a lots of features.
- Atom - Free : An open source IDE from Github
- Adobe Dreamweaver - Premium : Web Design & Development IDE from Adobe
- Web Storm - Premium : Web Development IDE from Jetbrains.
IDE stands for Integrated Development Envrionment. It's a term for a software that comes with a set of tools sepcific to software development and related workflow.
Now, that we have our Code Editor ready, next we need a Web Browser to test our web pages. If you are on windows, you can use the built-in Edge Browser or if on Mac Safari would do. Although the OS already comes with a built-in web browser you can still download and use any of the popular web browsers on the web. Here's a list of a major few
- Firefox : Free & Open Source Web Browser from Mozilla
- Chrome : Free & Open Source Web Browser from Google
Creating Your First Web Page
Now that we have our Code Editor & Web Browser ready, its now time to dive in some HTML code and build the first web page. In the previous section we have though discussed about the HTML document structure, its now time to write some code. Follow the steps below to build your first web page.
Step 1: Create a new File
You can use Notepad(PC) or Textedit(Mac) to work with HTML. You can also use Code editors or IDEs but for learning purposes we recommend starting with the simplest.
If you are on Windows, press Win + R key and type Notepad to open it.
Word processors or Rich Text Editors like Wordpad, MS Word are not suitable for writing HTML code as they add their own rich text styling to the document.
Step 2: Add Some HTML
It's now time to add some HTML code. Write or copy the following code in your Text Editor.
<!DOCTYPE html>
<html lang="en-US">
    <head>
        <title>An HTML Document</title>
    </head>
    <body>
        <h1>This is an HTML Document</h1>
        <p>This is a simple paragraph with a <a href="#">link</a></p>
    </body>
</html>
Step 3: Save the Document
Now if you have copied the code, it's now time to save it. If you're using Notepad, click on File menu and then click on Save. As the dialog appears, enter the filename myfirstwebpage.html. Please make sure to append the .html extension at the end as this is what signifies the file type of the file being saved.
Step 4: Preview Your Webpage
Open your saved myfirstwebpage.html file in a Web Browser and you'll see, your first web page.
The HTML Document Structure
Lets have a quick look at the structure of of our HTML document. The image below explains the purpose of the tags that we have used and below is the detailed explanation of the tags. The structure is simple for better understanding, as you dive further you will discover a little more complex structures.
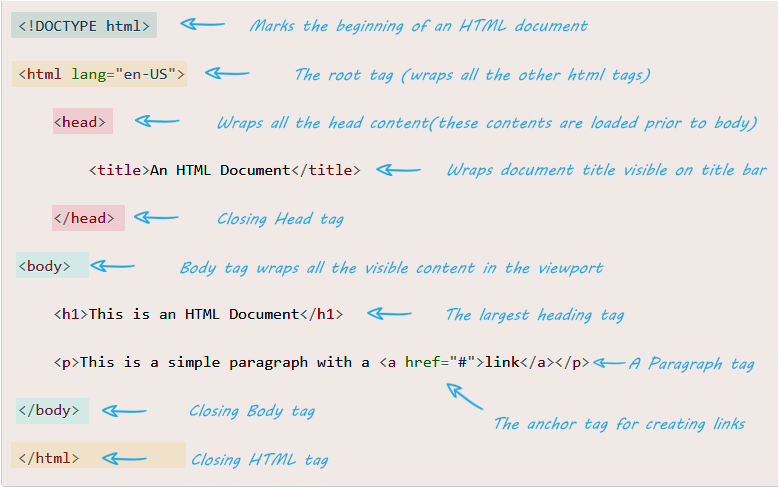
As you can see in the image above, we have used the following HTML tags
-
As you can see, the document begins with a
<!DOCTYPE html>declaration. This tells the browser that its an HTML5 document and we'll be making use of HTML5 features. -
The next tag that you see is
<html lang="en-US">. The<html>tag is known as the root tag and it wraps all other html tags within it. Every other html tag must be a descendant of this root element. -
Down the line, you will see the
<head>tag, this tag wraps all the other tags that provide information about the document to the browser. Within it you can see there's a<title>tag, this tag designates the title of the HTML document which is displayed in the browser's title bar. -
Finally comes the
<body>tag, this tag wraps the actual content of the document that is displayed to the user eg. headings, paragraphs, images, links, etc.
The contents of the <head></head> tag are loaded before the contents of the <body> </body> tag.
Conclusion
In this lesson, we made it through the development setup, we then created our first web page. We understood the HTML document structure, a few tags and it was all. In the next lesson, we will take a closer look at the HTML syntax and understand what HTML tags and attributes are.